Sign In First
You must be signed in to use the Bookmark feature.
- Bookmarks and quotes can be shared to Facebook and by email.
- See CMI User Accounts for details.
Bookmarks are paragraph markers that may contain highlighted text, annotations, and topic classifications.
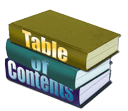
Click the menu bookmark icon to open the Bookmark Dialog window and view a listing of bookmarks within the current teaching. The bookmark icon behaves a little differently on landing and document pages as shown below.
On landing pages just click the bookmark icon to display the bookmark dialog.
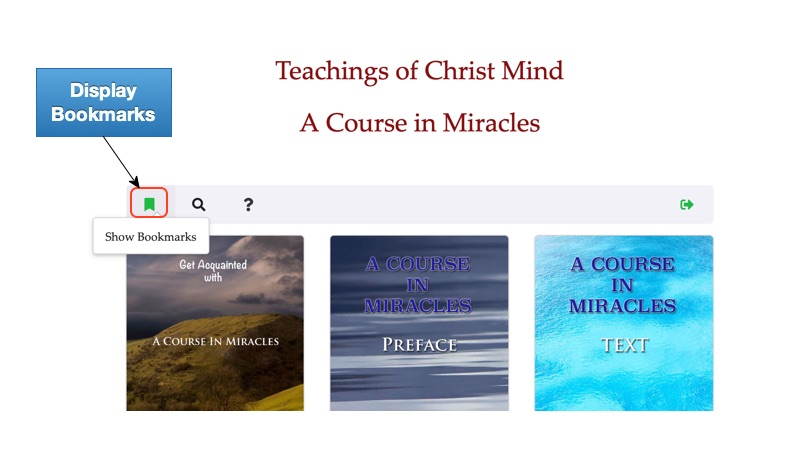
On document pages, the bookmark icon shows a dropdown menu, choose “Show Bookmarks” to display the bookmark dialog.
As described below, one way to create bookmarks is by selecting text. One of the side effects of this is that you are unable to select text to paste in another document because each time you select text the bookmark creation dialog is displayed effectively preventing you from copying the text.
You can disable bookmark creation so that copy/paste functions normally. Once disabled, the bookmark feature will remain unavailable until you enable it.
The disabled state is indicated by a small ‘x’ in the lower right hand side of the bookmark icon.
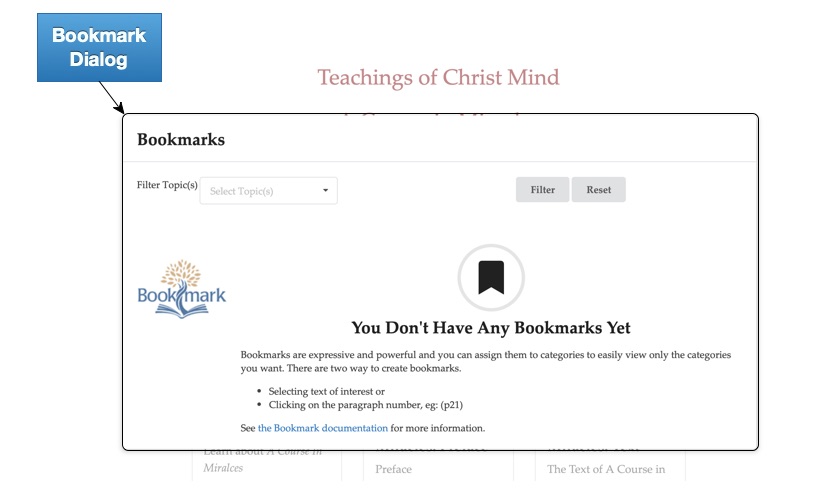
When you open the dialog before bookmarks have been created you’ll see this message. The “See the Bookmark documentation…” link at the bottom links you to this page.
There are two ways to create bookmarks.
The first method is by selecting text within a paragraph. This may be a sentance that you want to highlight within the document.
Note that selecting text is limited to one paragraph and making a selection that includes text from multiple paragraphs is not supported.
Selected text bookmarks can be used to create quotes that are displayed on the teaching home page and can be shared to Facebook and by email.
See the Text Selection section below for details on selecting text for bookmarks.
You can create bookmarks without selecting text by clicking the paragraph id found at the start of each paragraph. This is the paragraph number and looks like this: (p10).
If the paragraph number is not displayed, it is hidden by the paragraph number toggle in the menu bar. Just click the paragraph icon to show it.
In both cases, selecting text and clicking the paragraph number a Bookmark Create dialog will appear.
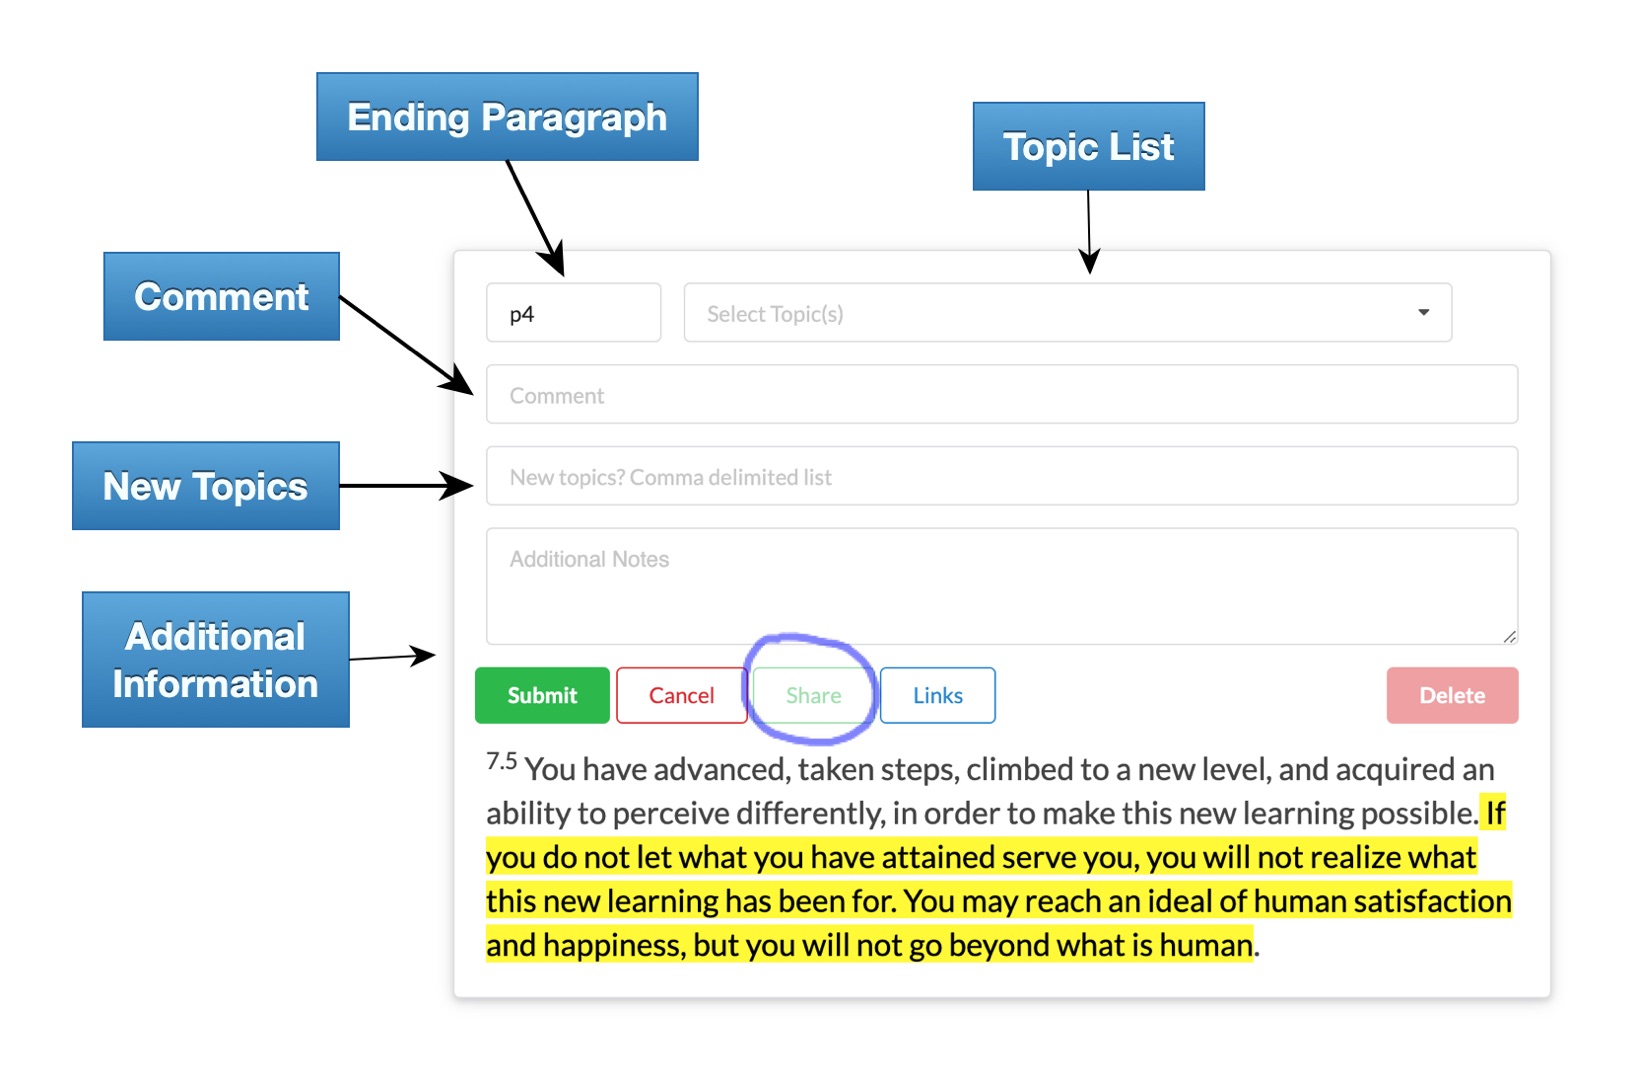
Note style bookmarks can span several paragraphs. The default value in the field is the starting paragraph number and you can change it to include later paragraphs. For example, when the bookmark begins on p11 and the Ending Paragraph field is set to p12 the bookmark will include both p11 and p12. A value less than the starting number is ignored.
This is helpful when the content you want to capture in a bookmark spans several paragraphs. See the Sharing Bookmarks section for an example.
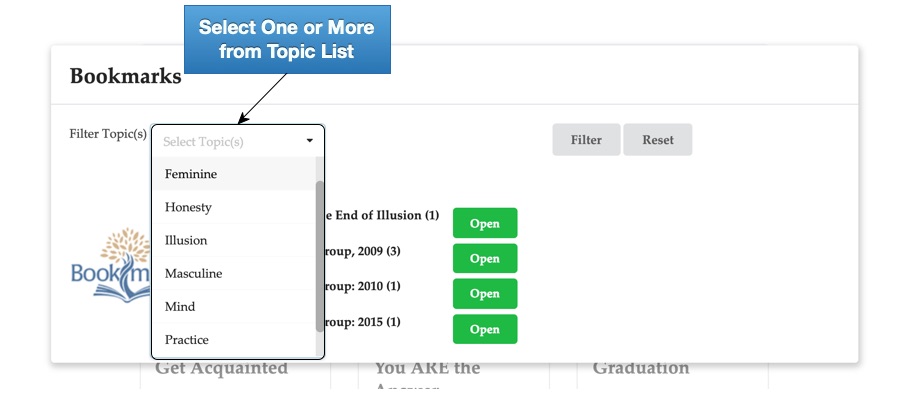
You can associate one or more topics to a bookmark as a way to place it in a category as an orgainzational aid. When you have many bookmarks it can be difficult to go back and find what you're looking for and topics are intended to simplify that problem.
The topic list is a dropdown list of all topics defined for bookmarks in the current teaching. Initially the list will be empty because no topics have been defined. Topics are defined using the *New Topics* field just below.
Selecting topics is optional and you can associate one or more with your bookmark. Just select topics from the list. If you want to use a topic that is not in the list enter it into the New Topics field.
You filter bookmarks by topic on a document page and in the bookmark list dialog. See below for details.
When you want to categorize the bookmark with a topic that has not been used before enter it in this field. Separate multiple topics by a comma. Topics can contain multiple words and will be formatted so that each word is capitalized.
For example, if you enter: "holy spirit, awakening", two topics will be created "Holy Spirit" and "Awakening". They will be associated with the current bookmark and added to the topic list for use in future bookmarks.
The Additional Information field is used for extra notes you want to add to the bookmark.
There are two ways to share bookmarks and clicking the Share button is one of them. The button is disabled when you first create a bookmark but is available when you edit it. See the Sharing Bookmarks section below for further details.
Links allow you to create one or more links from one bookmark to others. This could be useful to connect a group of related bookmarks together and allows you to jump from one to the next. And you can link to bookmarks in different teachings.
See the Linking Bookmarks section below for more information.
When you finish with the form, click “Submit” to create the bookmark or “Cancel” to cancel. Notice that “Delete” and “Share” are disabled for new bookmarks.
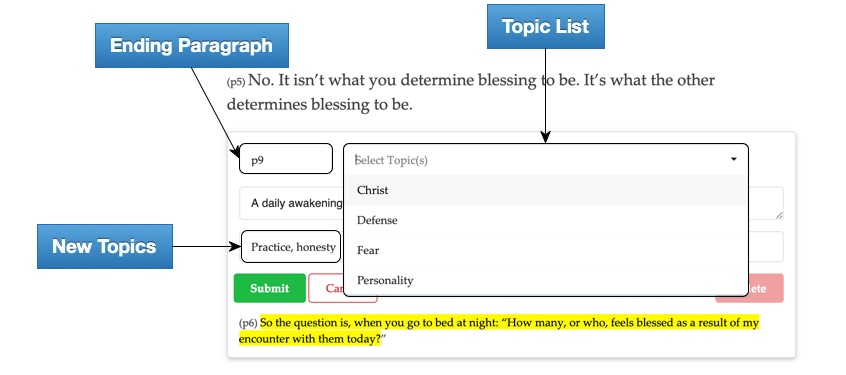
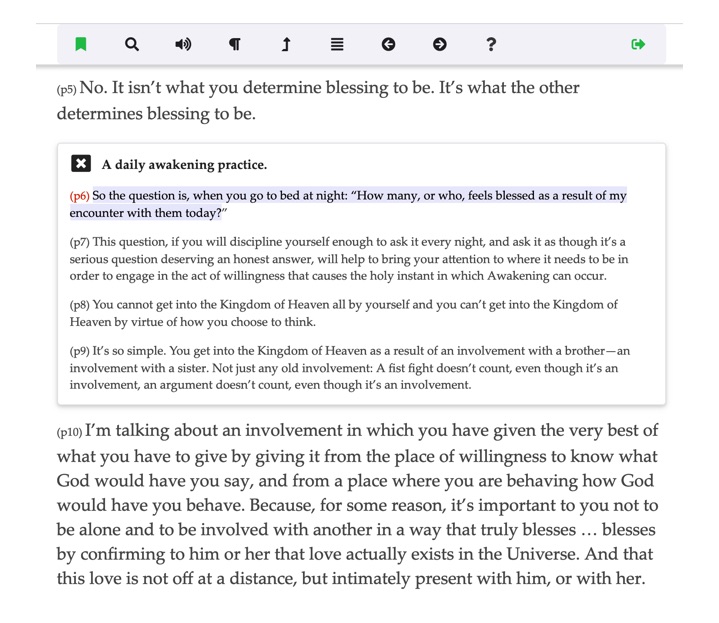
Here is an example of a filled out form for a new bookmark. Notice that the “Ending Paragraph” field was changed from p6 to p9 so the bookmark refrences 4 paragraphs, from p6 to p9. Notice also that two new topics will be created “Practice” and “Honesty” and that the “Topic List” already contains previously defined topics.
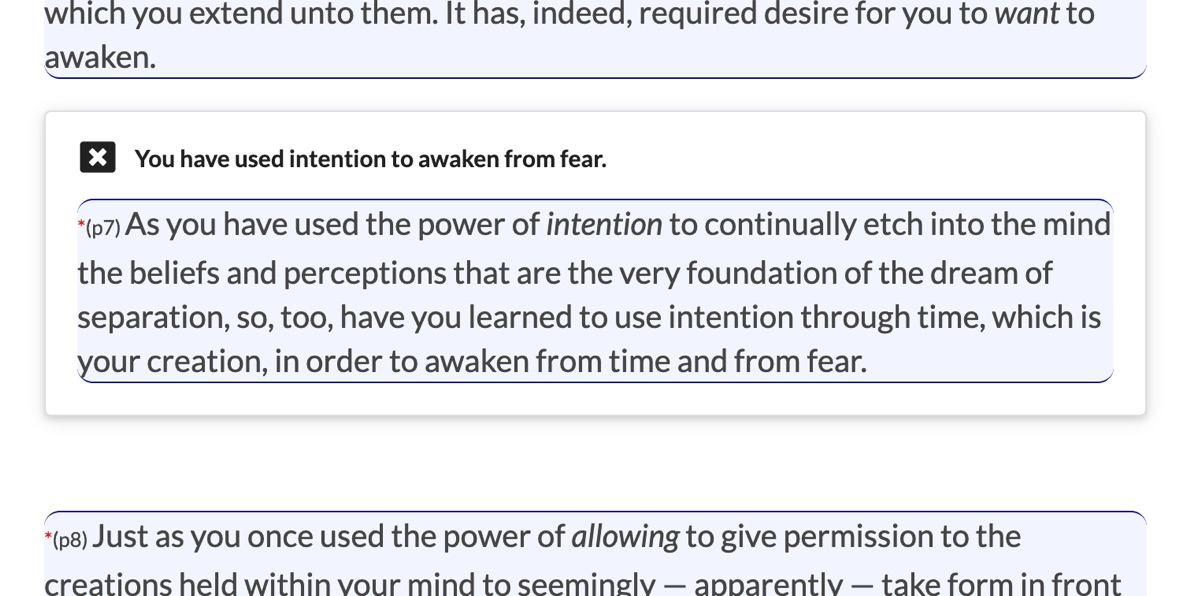
Note: The paragraph id of paragraphs containing selected text bookmarks is displayed in red. For Note sytle bookmarks, the paragraph id is preceded by a red asterisk.
Now when you click the Show Bookmarks menu option you see the bookmark dialog showing the bookmark we just created. Initially, the list contains an entry for each component of the teaching that has bookmarks defined with the name of the component and number of bookmarks displayed.
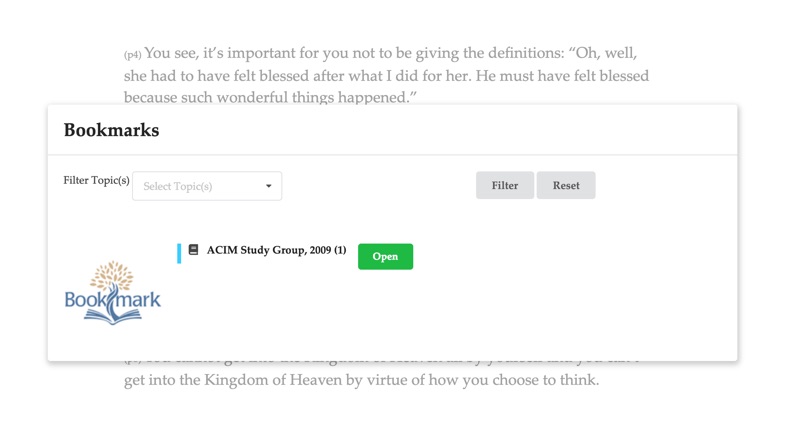
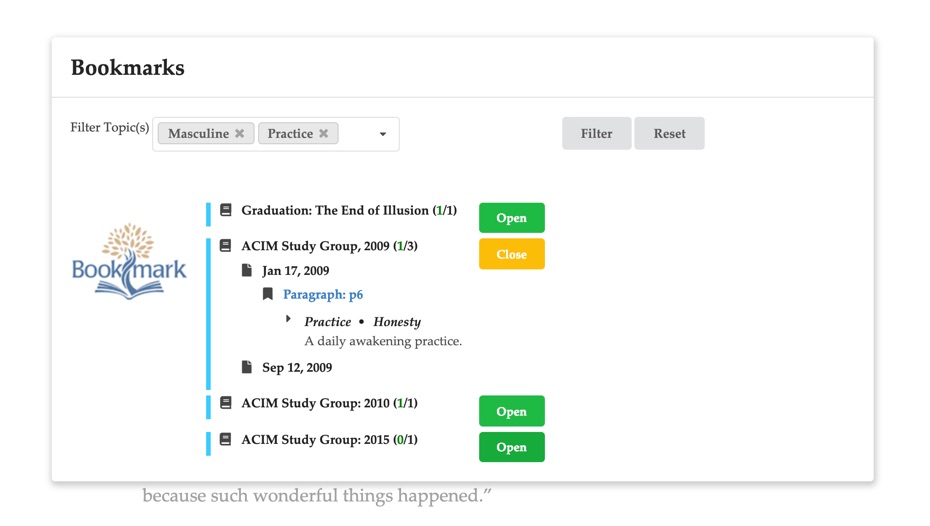
The details of each bookmark can be seen by clicking the green “Open” button.
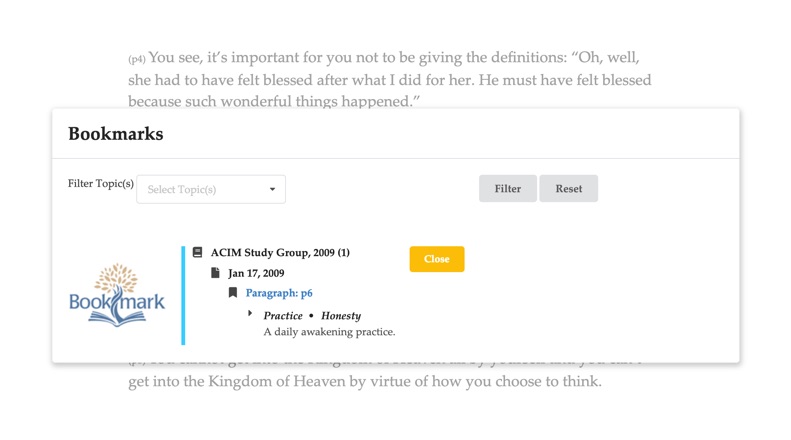
Here, you can see there is one bookmark for the ACIM Study Group, 2009 taken from the Jan 17, 2009 session with Raj. The bookmark is from paragraph 6 with topics “Practice”, and “Honesty” with a comment of “A daily awakening practice.”
When you click on the link “Paragraph: p6” the Jan 17, 2009 document will be displayed and scrolled to paragraph 6.
When you open a bookmark from the bookmark dialog the Bookmark Navigator becomes active. Like the Search Navigator, the bookmark navigator allows you to navigate between bookmarks on the page and between pages of a teaching.
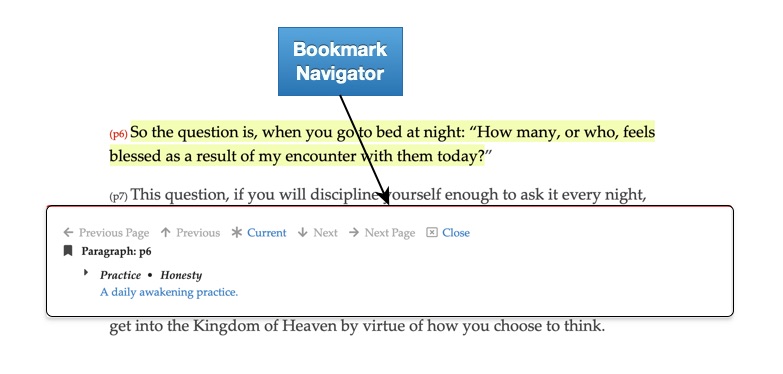
In this example there is only one bookmark defined so the previous and next links of the navigator are disabled.
When viewing any page with bookmarks the bookmarks are automatically highlighted when the page is loaded. Different colors are used when there are multiple selected text style bookmarks defined for a given paragraph.
You can take a quick peek at the bookmark by hovering the mouse over highlighted text.
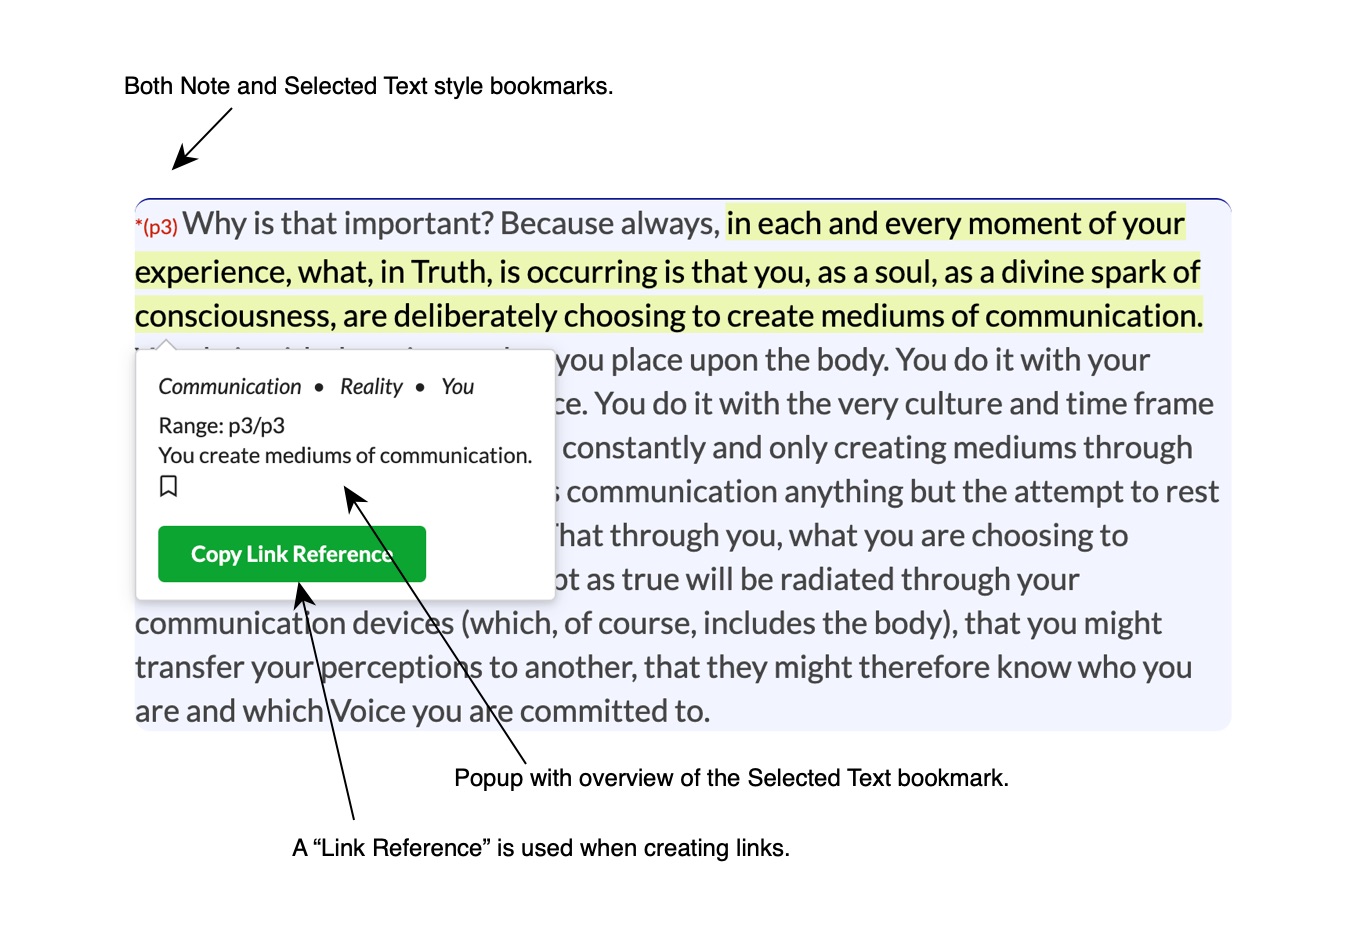
In this example there are both Note and Selected Text style bookmarks and that’s where the paragraph id is red and preceded by an asterisk.
The popup show an overview of the Selected Text bookmark highlighted in yellow. It has the topics Communication, Reality, and You, starts and ends in paragraph p3 and contains the comment “You create mediums of communication.”
The Copy Link Reference button is used when creating bookmark links. See the Linking Bookmarks section for details.

You change the range, topics, comment and even add new topics. Press “Submit” to save the changes, “Cancel” to discard changes, and “Share” to share the bookmark by Facebook or email. You can also press “Delete” to delete the bookmark entirely.
When shared, the bookmark text and a link to the page and paragraph, is sent to the recipient(s). They can click the link to see the bookmark directly in the source from which it came. In this way the content is not taken out of context and can be easily discovered.
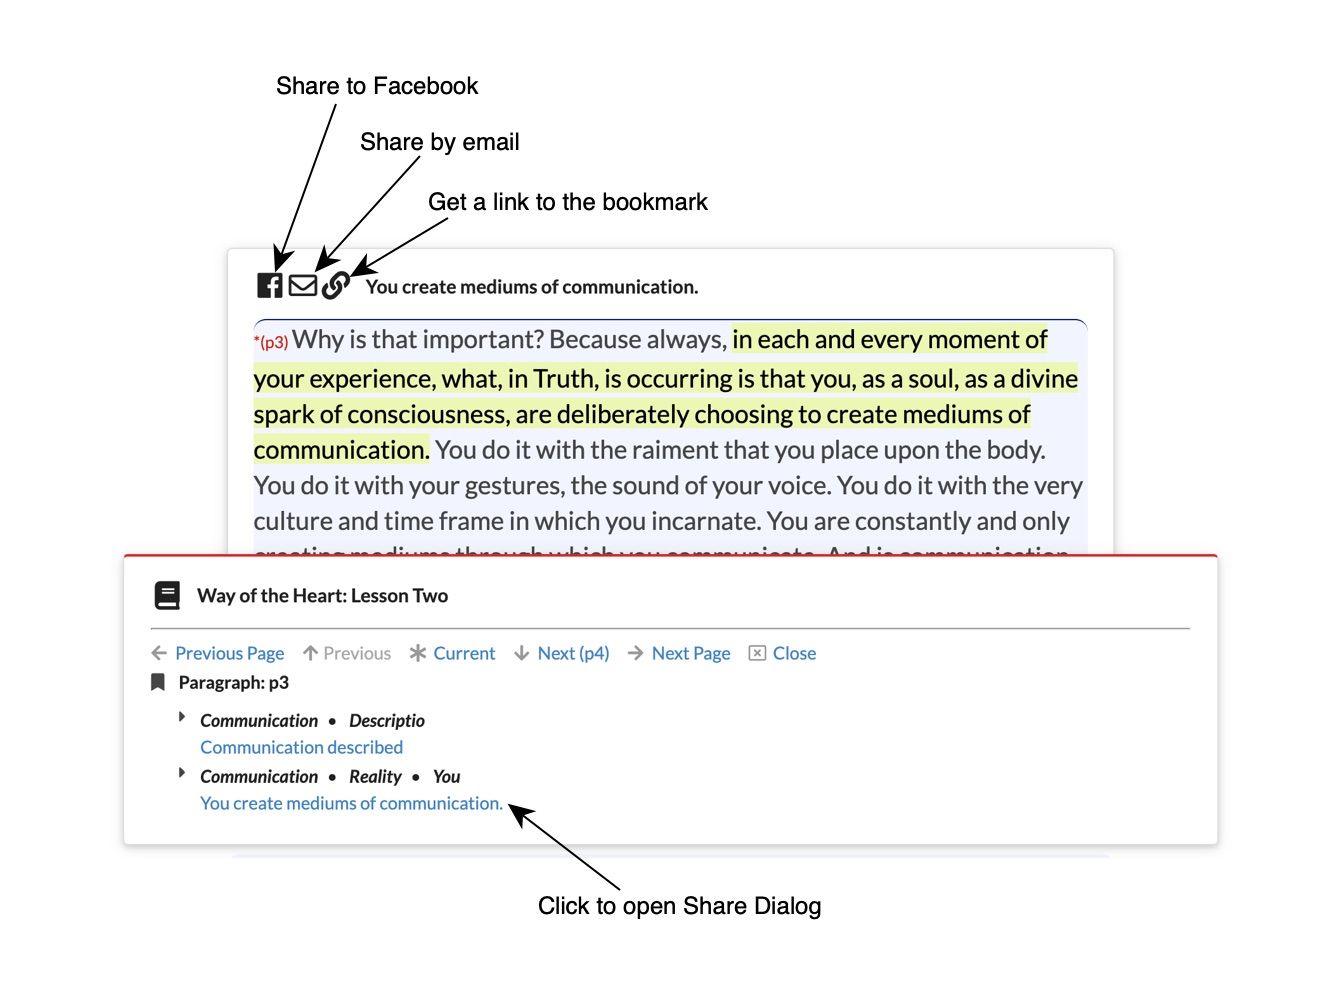
Bookmarks can be shared to Facebook and by email. When you find something in a teaching you find inspirational and want to share it, create a bookmark and follow these steps.
First, navigate to the bookmark. There are two ways to do this; using the Show Bookmarks Dialog or when editing a bookmark.
Open the Bookmark List Dialog as discussed earlier. The page will load and the bookmark navigator will be active.
Click the comment in the bookmark navigator to share the bookmark. The display will change to show you how it will look when a recipient follows the link that was shared.
Click the highlighted text of a bookmark on a document page or, for Note style bookmarks click the paragraph identifier. This displays the bookmark edit dialog. Next to the Submit and Cancel buttons is the Share button. This is disabled when the bookmark is first being defined and has not yet been saved.
Clicking “Share” will close the edit form and change the display to look similar to the way it will look when a recipient follows the link that is shared.
Remember you can edit the bookmark comment before you share it if necessary.
If it looks good, press the icon to share to Facebook or icon to share by email.
Here’s what it looks like when you share to Facebook.
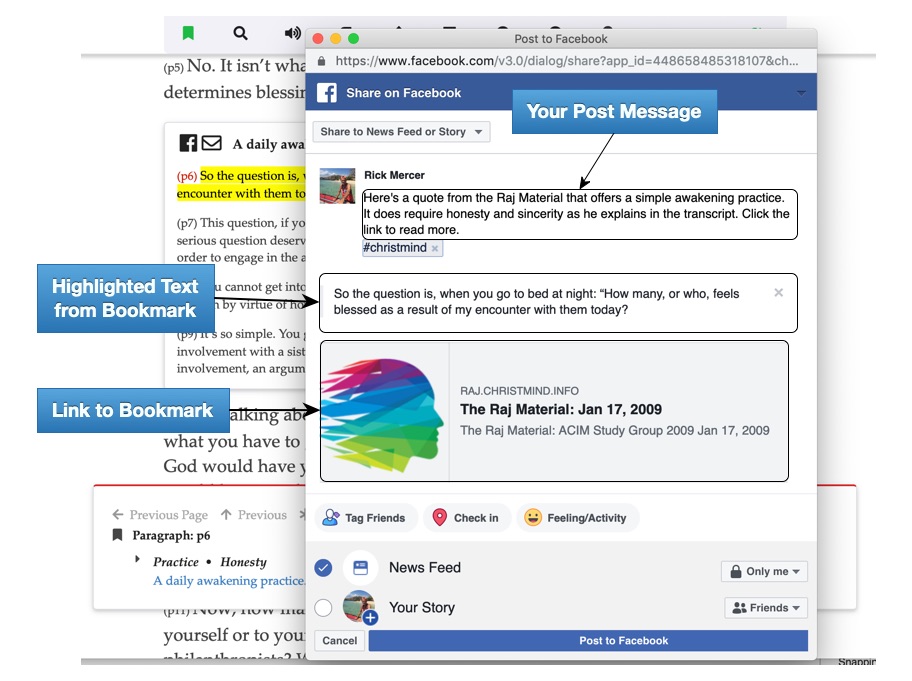
On Facebook, when someone clicks on the link in your post, the page containing the bookmark will be opened and scrolled to the bookmark location. The display will look like this. The bookmark is emphasized in place using the bookmark comment as a title. The emphasis is removed when the “X” is clicked.
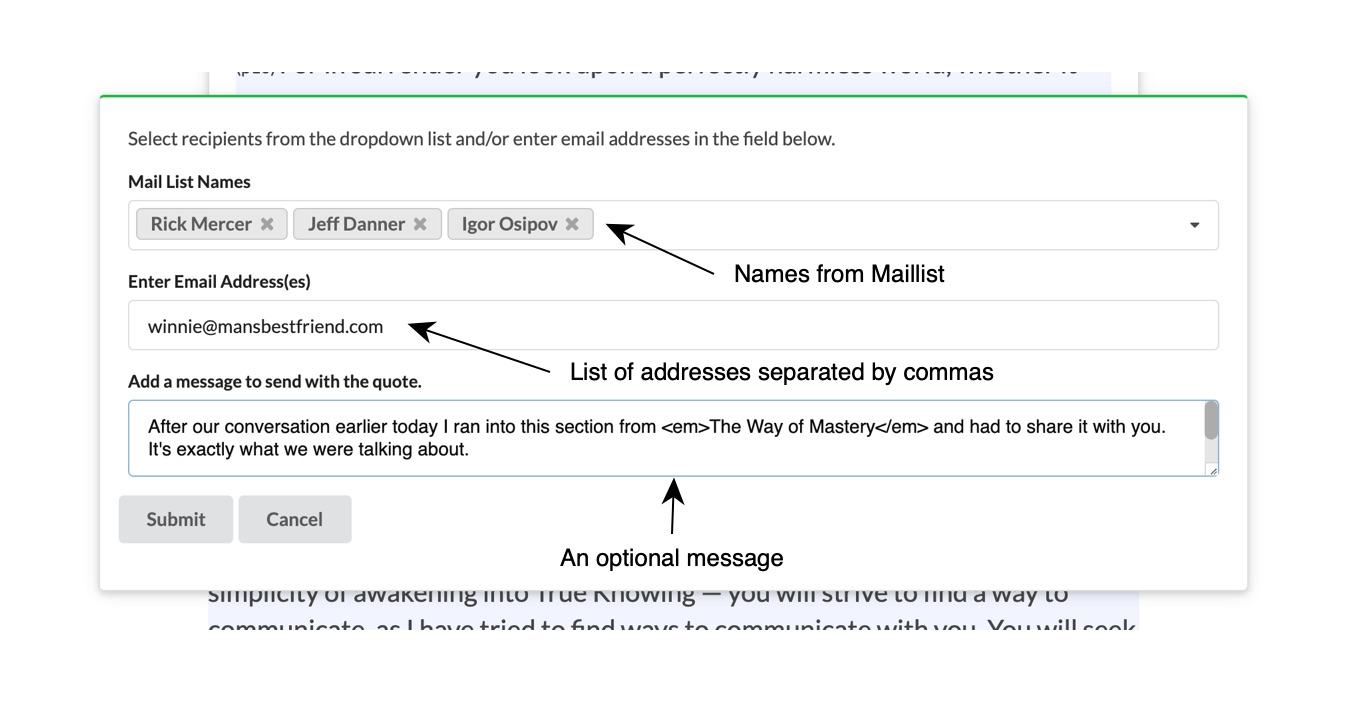
When you share by email you are prompted to enter the email addresses of those you want to share with. You can select names from a predefined maillist that you create and/or enter one or more addresses separated by a comma. An email will be sent to each address.
You can also add a message to the recipients if you like and optionally include html as shown in the example.
Learn about creating a maillist in the User Profile section.
When you press “Submit” the email will be sent. It will take a few moments to receive confirmation that the messages were successfully delivered.
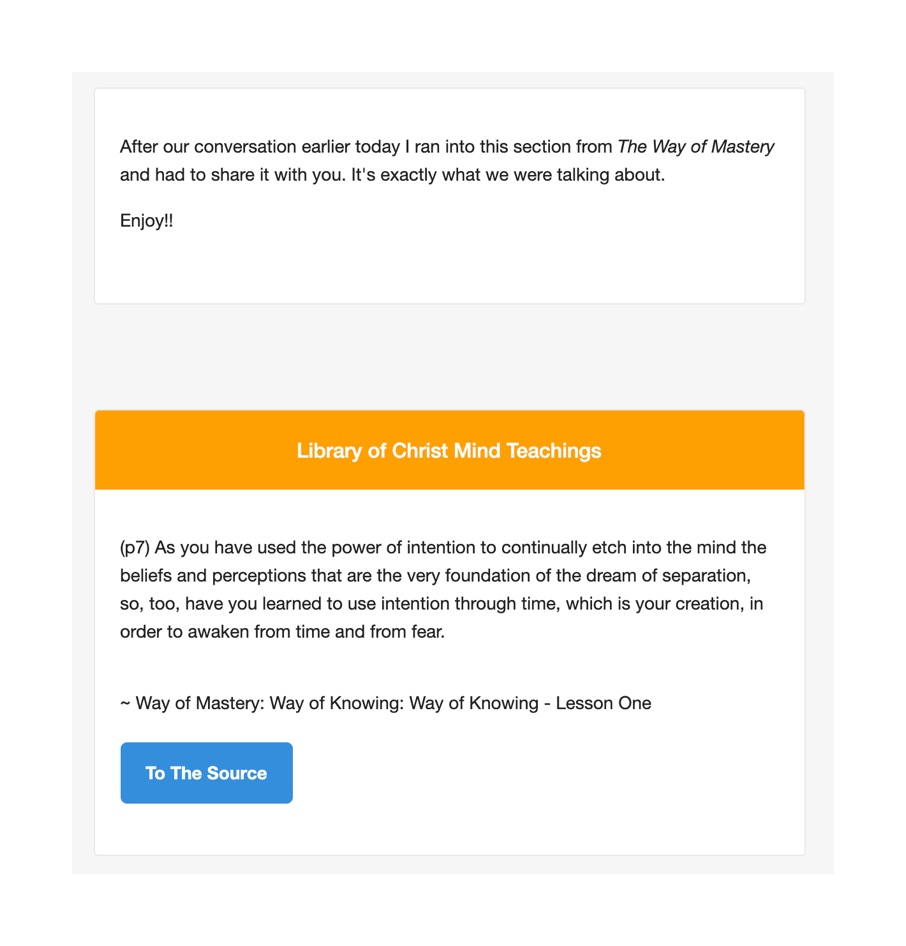
The recipient will receive a message with the subject: [Your Name] shared a quote from the Library of Christ Mind Teachings.
Here’s what the email looks like.
When sharing bookmarks via email check with the recipient to see if they received the email. It is possible that it gets delivered to the junk folder; we don’t want that, it’s not junk!
When the “To The Source” button is clicked in the email the browser is opened and the page with the bookmark is loaded and the bookmark is displayed. This is how the page will be presented.
When you share a quote using a mail list that you created and you select multiple addresses from the list, you can personalize your message by adding a placeholder.
In the example below the first name of each recipient will replace the placeholder %recipient.first%. There are two placeholders available, %recipient.first% and %recipient.last%.
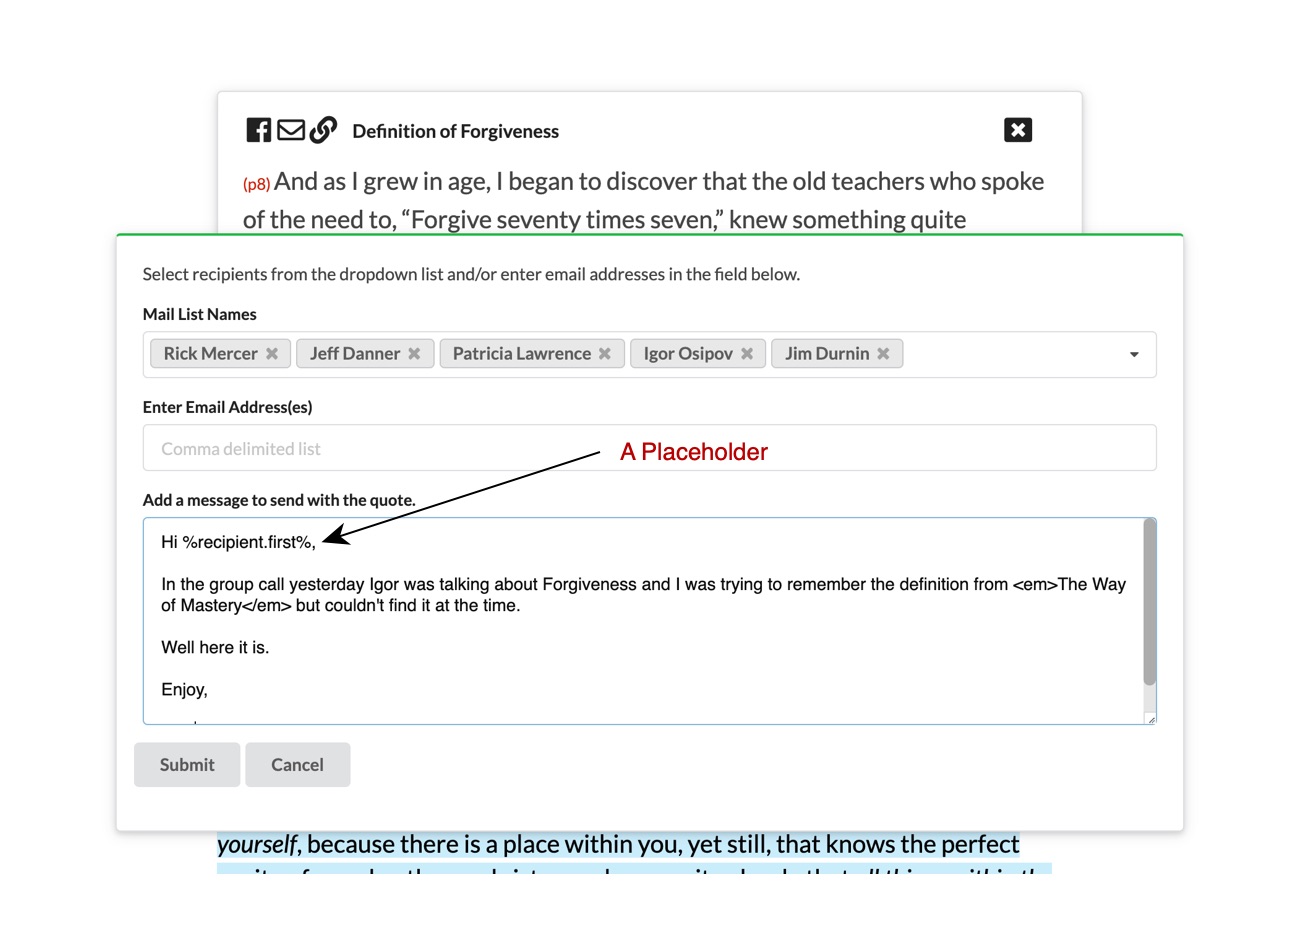
This is very nice when sharing quotes with groups.
If you’ve defined a lot of bookmarks the page may look like your favorite spiritual text - all marked up. Bookmark highlights for Selected Text bookmarks can be turned off, either selectively or for all bookmarks on the page.
To turn off the highlight for all bookmarks select the “Hide Highlighted Text” option from the Bookmark menu. To turn the highlight on again go back to the Bookmark menu and choose the “Show Highlighted Text” option.
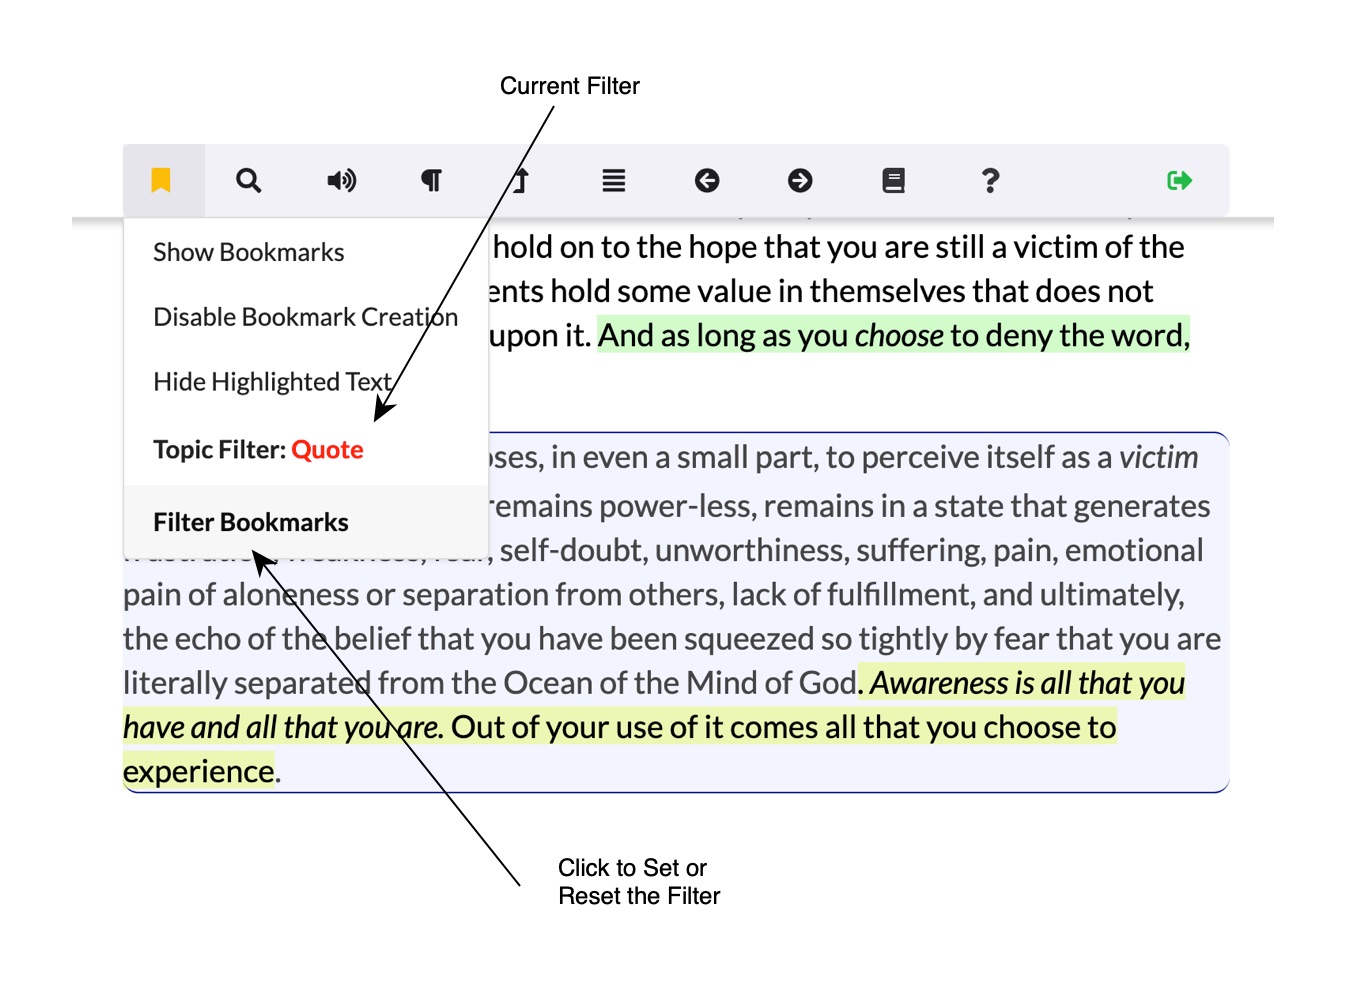
You can limit display of Selected Text bookmarks to those containing a specific topic. Pick the topic from the “Filter Bookmarks” option of the Bookmark menu. This is a list of all topics used in all the bookmarks on the page. Text will remain highlighted only for those bookmarks containing the selected topic.
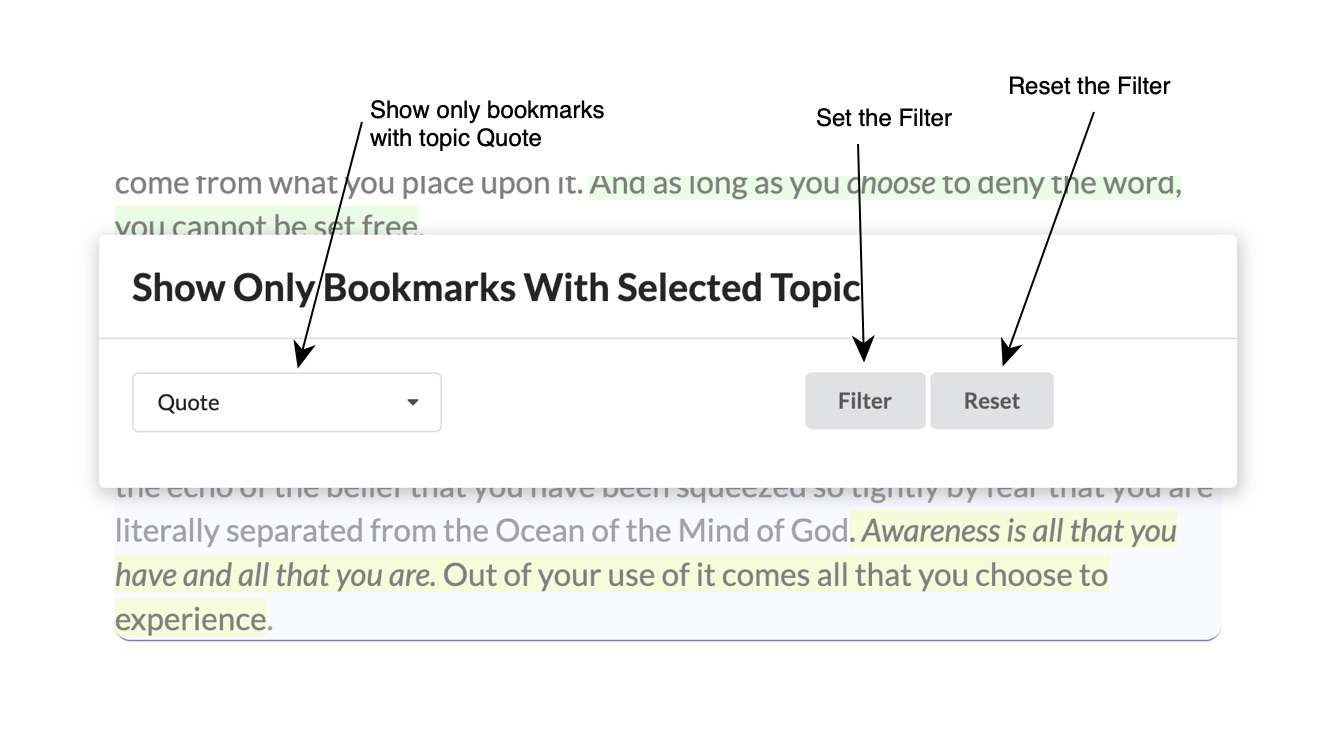
The “Topic Filter” header in the Bookmark menu will show, in red, the topic selected when a filter is active.
To clear the filter select the “Clear Filter” selection of the “Page Topic List”.
When you have a lot of bookmarks and want to search through only those containing selected topics start with the Bookmark List Dialog. A Filter option allows you to filter bookmarks by one or more topics and the filter will be honored by the Bookmark Navigator as you move to different pages.
Select one or more topics from the Filter Topic List in the Bookmark List Dialog and click the “Filter” button.
Little changes after filtering but the results have been filtered and can be seen in the bookmark count to the right of the component names in the list.
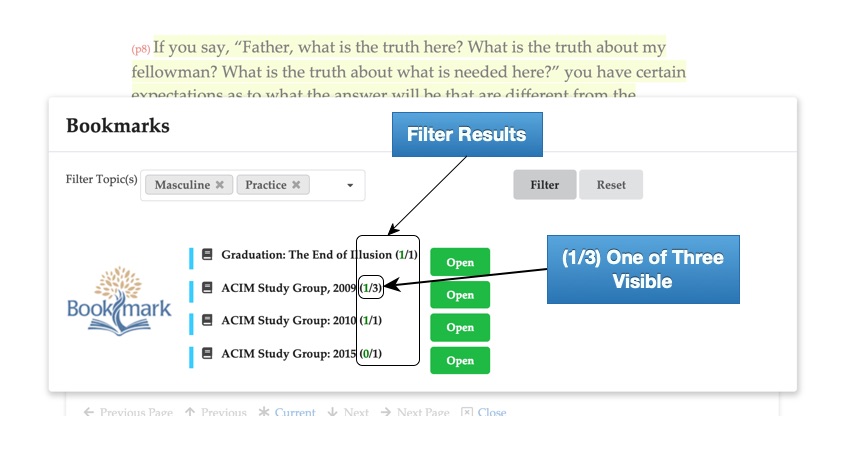
Here, only bookmarks containing the topics “Masculine” and/or “Practice” remain in the list. The “ACIM Study Group, 2009 (1/3)” component has three bookmarks and all but one have been filtered.
Now, when you follow a bookmark link from the filtered list, the Bookmark Navigator that opens on the page will ignore all filtered bookmarks. Clear the filter by clicking the Reset button on the Bookmark List dialog.
Linking allows you to link a bookmark with one or more other bookmarks so that you and quickly to the linked bookmarks. You can link to bookmarks in the current of in different teachings. Linking allows you to create your own navigation to related topics throughout the Library.
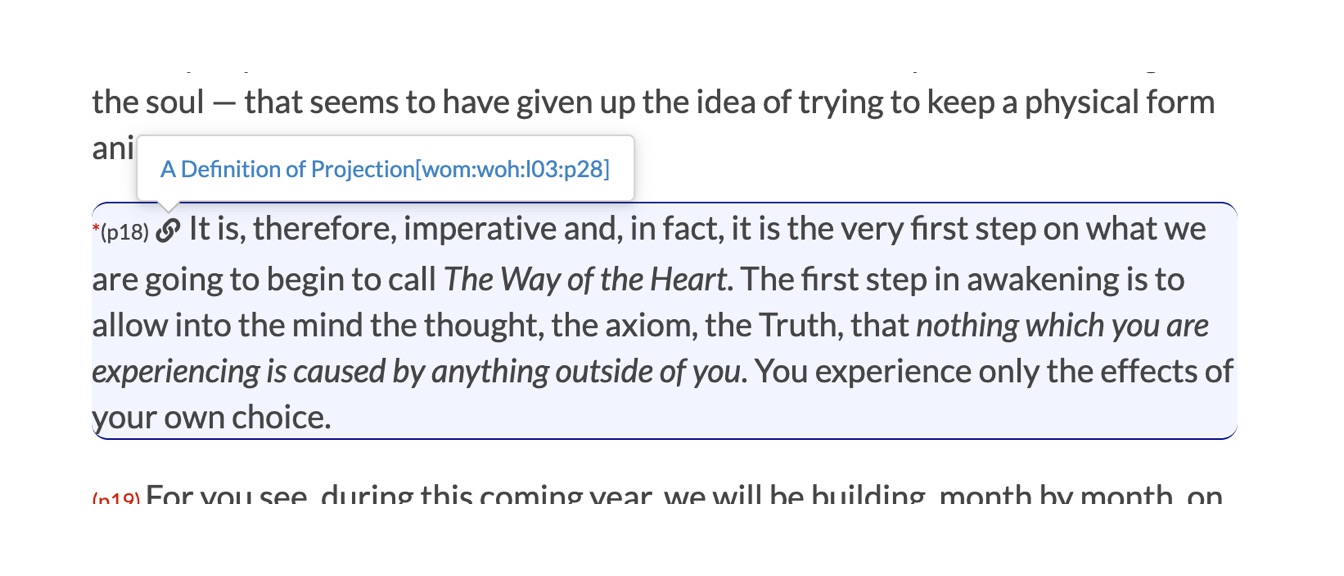
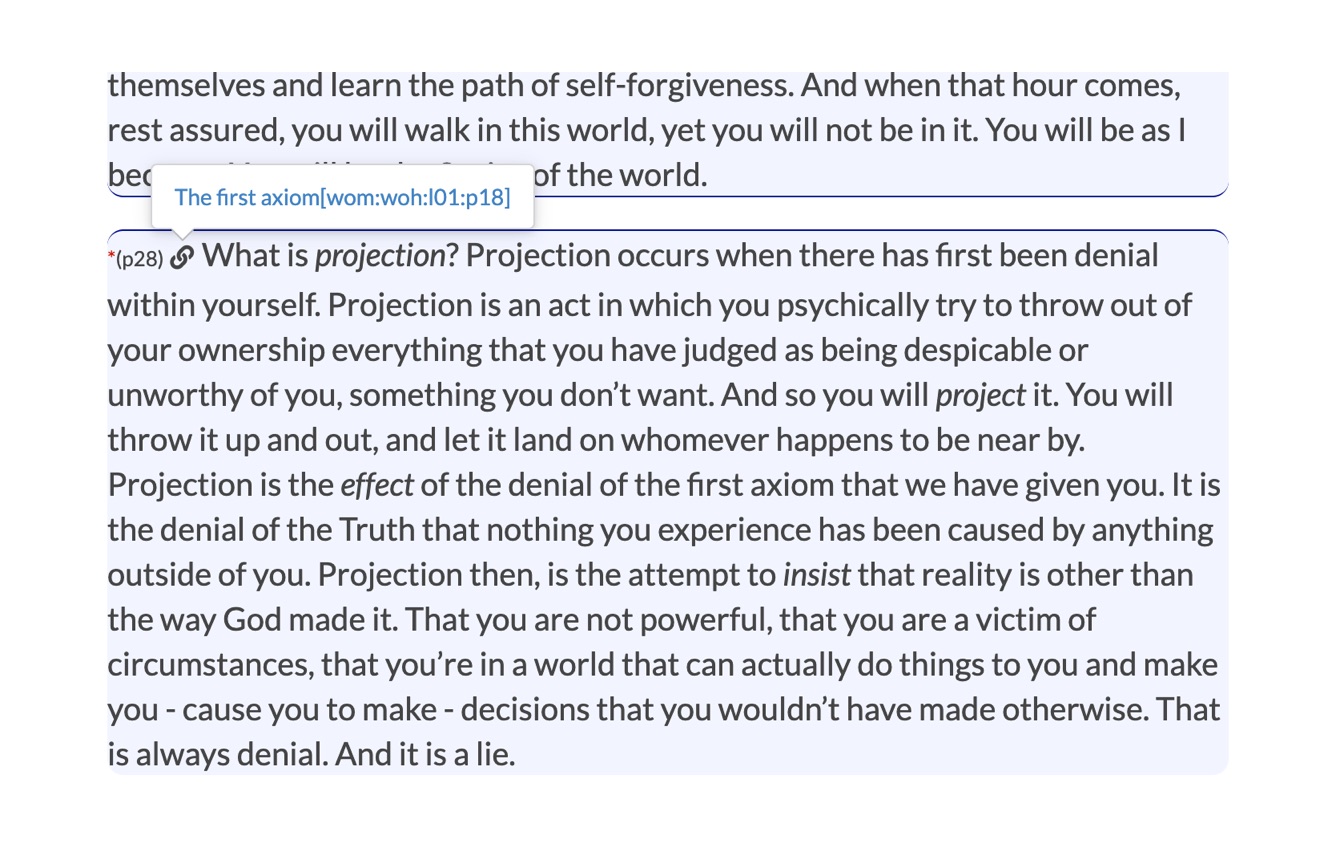
Below is an example of a Note Style bookmark that has a link defined. The link is indicated by the icon. Clicking on the icon will show all the links that have been defined, in this case there is just one.
The link has a short description and a reference to the where the link points to, in square brackets. Clicking the link will take you directly to that location.
When creating links you must first get a reference to the bookmark that you want to link to. This is done by clicking the green Copy Link Reference button in the bookmark summary popup. The popup is displayed whenever you hover the mouse over hightlighted text in a Selected Text bookmark or over the paragraph id for a Note Style bookmark.
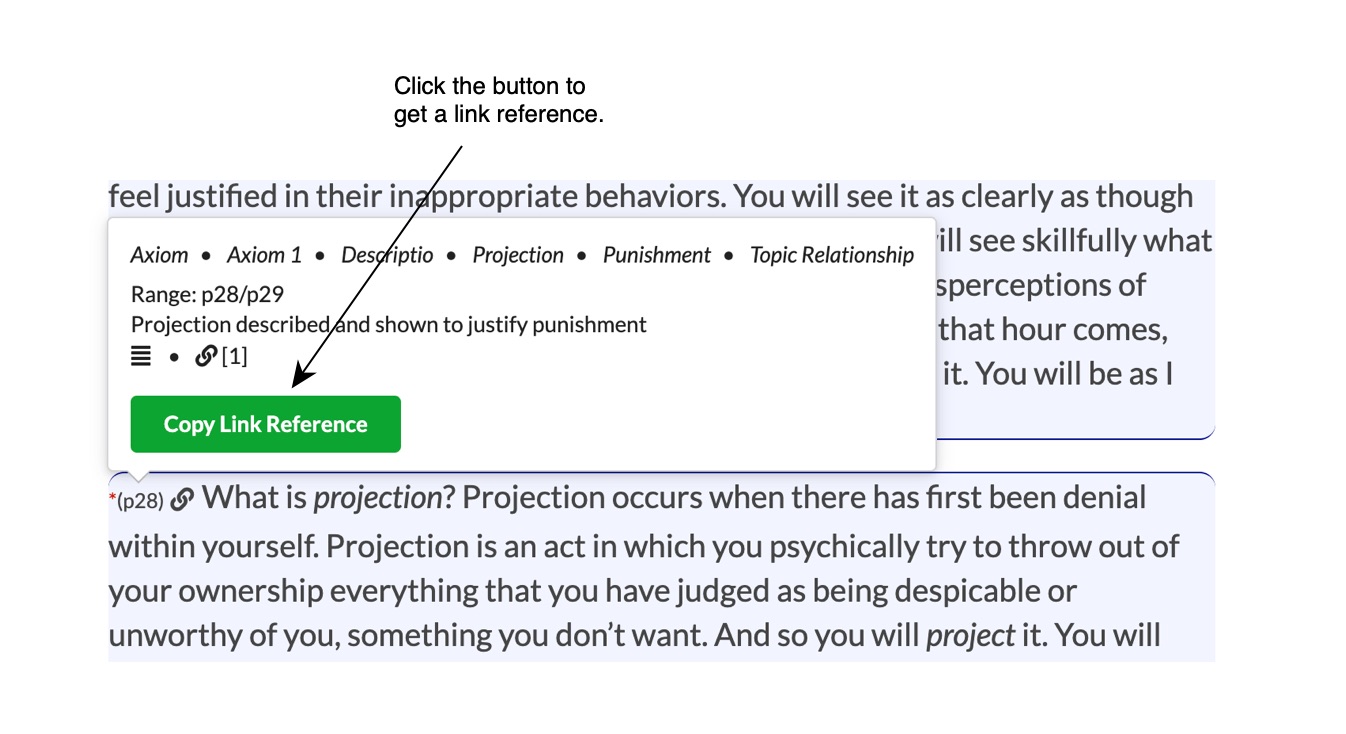
This link will be used to create a in the bookmark that this bookmarks points to back to this bookmark.
Edit the linked bookmark and click the Link button to open the Linking dialog.
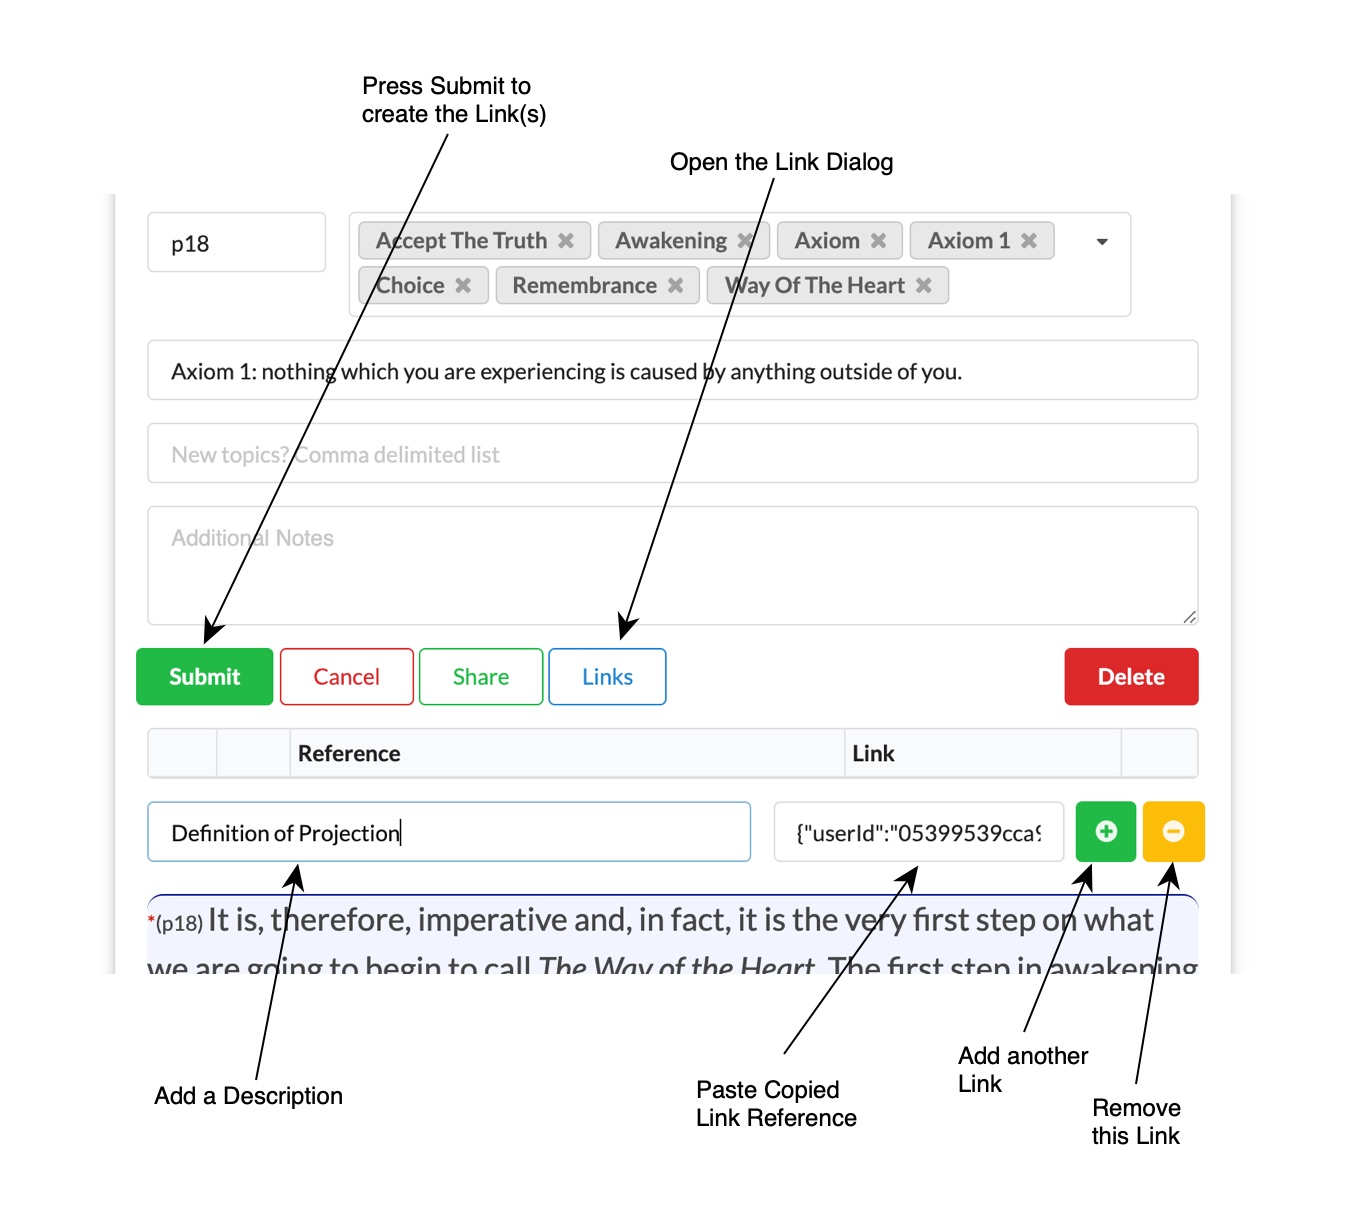
In the Link dialog, copy the Link Reference into the Link field. You must use a reference that came from clicking the green button as described above or it will be rejected. You also cannot enter a link that references itself.
Add a description of the link and press “Submit” to create the link. You can also add another link by pressing the green “+” button before pressing “Submit”. Click the yellow “-“ button if no longer want the link.
Here’s the new link just created. Click on that and go directly to the bookmark that links to this one.